What Is a Geoboard?
Invented in the 1950’s by Caleb Gattegno, the geoboard is a simple but amazingly powerful manipulative for demonstrating and exploring a whole range of mathematical principles. Caleb Gattegno was a mathmetican and educator who taught and wrote extensively on education and human development and sought to find ways to make learning easier and more natural. Geoboards have been made in a variety of sizes and from various materials over the years, but are essentially: a flat surface with a grid of pegs.
We make our Geoboards from solid maple or walnut hardwood and offer them in two sizes: Small (49 pegs) and Large (100 pegs). Each geoboard comes with a packet of rubber bands and our Large Geoboard is engraved with 1-10 on the x and y axises, giving it even greater functionality.
Here are seven ideas of How to Use Your Geoboard:
- Basic Shapes
- Math Equations
- Multiplication & Arrays
- Bar Graphing
- Area & Perimeter
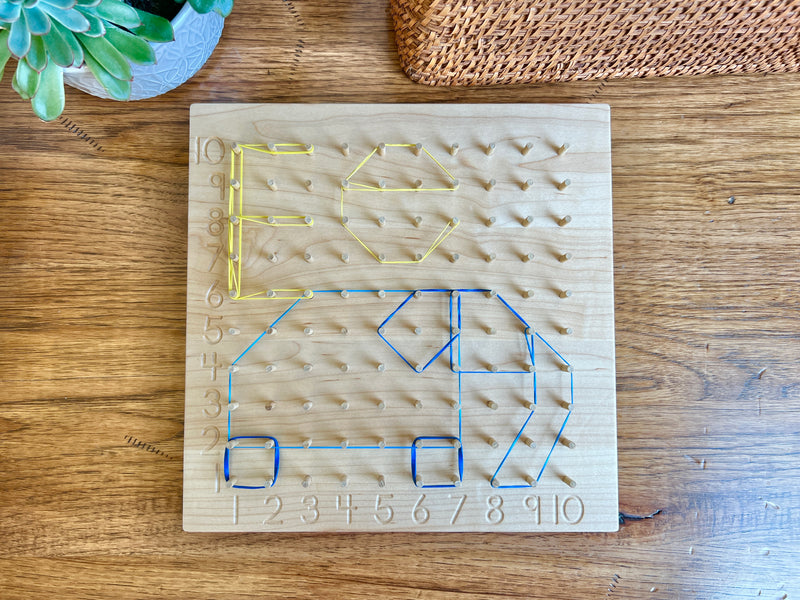
- Pictures
- Marble Mazes
_______________________
IDEA #1: Basic Shapes
Geoboards are such amazing mathematical manipulatives because they grow with your child. Young learners begin by simply creating shapes using the supplied rubber bands. While doing this they will learn about basic shapes, their sides, their vertexes, and their relation to one another. Using these basic shapes children can get creative and begin making objects and scenes.
_______________________
IDEA #2: Math Equations
You can create a group of total pegs for each equation to show the child that while you always have a total of 18 pegs in the overall group, you can divide it into different parts that are either added or multiplied together.
Let's see what equations we can find to equal 18.
- 18 = 9 + 9 (shown in photo)
- 18 = 9 x 2 (shown in photo)
- 18 = 3 + 3 + 3 + 3 + 3 + 3
- 18 = 6 + 6 + 6
- 18 = 3 x 6
_______________________
IDEA #3: Multiplication & Arrays
Here is where the engraved 1-10 on the Large Geoboard can be especially useful.
Use your geoboard to demonstrate multiplication by capturing groups of pegs inside a rubber band. As shown here, we're moving the top of the rubber band up in each consecutive photo:
- 3 x 5 = 15
- 3 x 6 = 18
- 3 x 7 = 21
- 3 x 8 = 24
This is such a great quick way to help understand that you are adding groups together and doing skip counting.
Now you can practice arrays on the board. Arrays are a group of objects in columns and rows. In this next photo, the arrays demonstrate the following multiplication equations:
- Red Array 3 x 8 = 24
- Blue Array 4 x 6 = 24
- Yellow Array 5 x 4 = 20
- Blue Array 8 x 7 = 56
_______________________
IDEA #4: Bar Graphing
In this example, we're asking children what their favorite farm animal is, choosing from horse, cow, pig, and goat. Then we can graph the responses on the board. If each number on the left side represents "1 Child," then we read it as 6 children like horses, 4 children like cows, and so on.
Or, you can say each peg represents "5 children" and then you'll multiply the six pegs for the horse and note that it is 30 children favoring horses. The animal coins at the bottom are from our Alphabet Animals Coin Set.
_______________________
IDEA #5: Area & Perimeter
When learning about area and perimeter, you're going to shift your focus from counting pegs to counting the squares between the pegs. The pegs are the corner points of each square.
Create a grid anywhere on the board (you won't be using the numbers for this activity). Once you have the grid, you'll count the squares to find out the area or follow the equation: Area = length x width.
- Length is 4. Width is 3.
- Area = 4 x 3
- Area = 12
For perimeter, you'll count the outside boundary of the entire grid between each peg (the line segments from peg to peg) or use the formula: Perimeter = 2 x (length + width).
- Length is 4. Width is 3.
- Perimeter = 2 x (4 + 3)
- Perimeter = 2 x 7
- Perimeter = 14
_______________________
IDEA #6: Pictures
Let's stimulate some creative action and encourage your children to design their own images on the geoboard. They'll use different shapes and angles to come up with simple to complex pictures.
For a fun challenge, play the Mirror Game. One of you will create a design on half of the board. Then the other will try to recreate the exact same design but mirroring it on the other side. Think of something like a butterfly. You'll make the left wing and then the second person tries to make the right wing look exactly like it as a mirror image.
_______________________
IDEA #7: Marble Mazes
With so many directions you can take this concept, you'll enjoy creating your own maze on the board that you can roll a marble through. Once it is complete and ready to play, just hold the geoboard in your hands and tip it around to move the marble through your maze.
_______________________
Conclusion
As you can see, there are so many ways to play with your geoboard and use it for learning and activities. And sometimes, just give your child the board and bands and see what they come up with on their own. I remember when I had a toddler, he would sort the rubber bands by color. He had all the reds stacked on the same row of pegs. The yellows under that on their own row, and then blues below them. It was a great way to build dexterity and fine motor skills.
So whether you have a toddler or higher education student, there's something for everyone to enjoy on the geoboard. You can find our geoboards at the following links:
Small Geoboard:
https://www.treasuresfromjennifer.com/products/geoboard
Large Geoboard:
https://www.treasuresfromjennifer.com/products/multiplication-geoboard

Hi, I'm Jennifer!
Mother to five children, wife to my amazing husband Joe, and we are honored owners of "From Jennifer" where we design, create, and ship our wonderful wooden educational toys and more. Each item we offer is created to bring a natural beauty to your space and inspire a love for learning. In my blog, I will strive to share creative ideas of how to use them along with other information, product releases, and updates around the shop. Please let me know in the comments if what I'm sharing is helpful!


0 comments